Category Archives: Wildlife

5 Lessons from Speaking to a Local Camera Club

Last month I was the guest speaker at the Maroondah Photographic Society meeting. It was fun to share images and talk about ‘action photography’. I particularly enjoyed the discussion and the questions, and while I was the presenter, I also learned a lot. Here are 5 Lessons from Speaking to a Local Camera Club.

Lesson 1 – It’s Fun to Talk with Other Photographers

My first lesson was more of a reminder than a lesson, and that is – it is fun to talk to other photographers. We share a passion for creating images, and I really enjoyed sharing images and talking with this group.
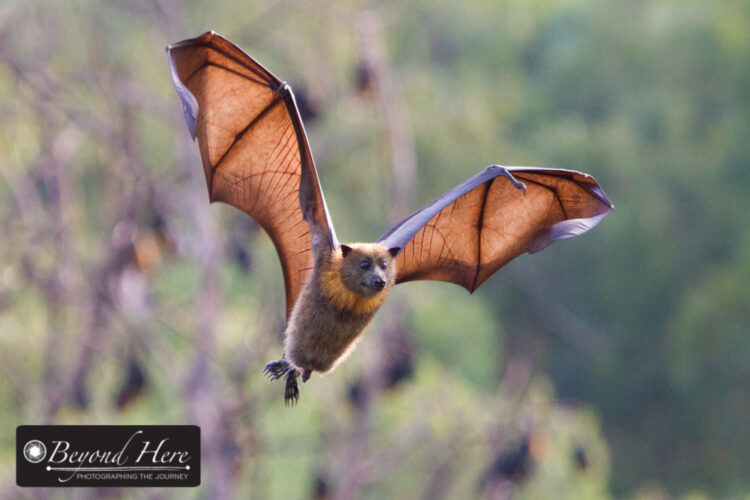
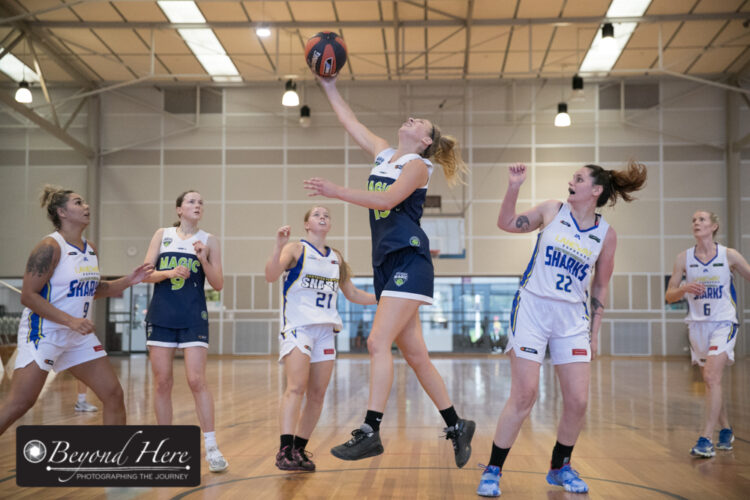
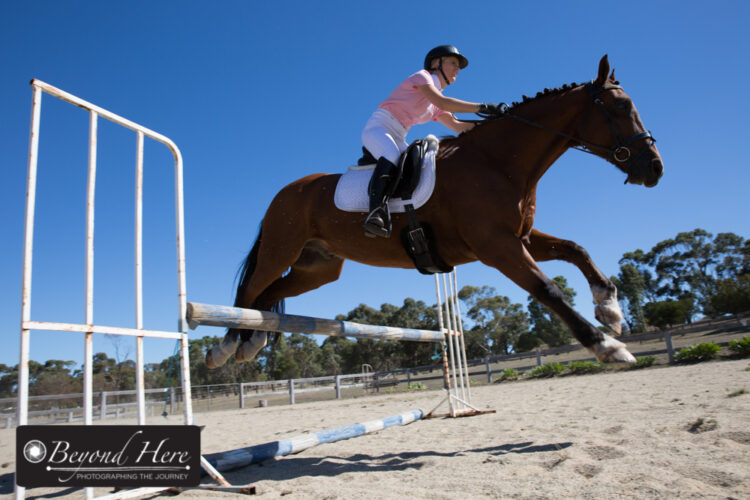

Lesson 2 – Photographers like to Know Your Camera Settings

During the discussion on action images, with nearly every image someone was asking about camera settings. It took me a little by surprise. Perhaps it’s due to experience (or old age!) but I rarely ask about camera settings. I have either experienced taking different styles of shots, or can estimate by looking at the image what the camera settings will be. That aside, the lesson was that the members of this club were interested in camera settings. Next time I will include them for each image.

Sports images are my main subjects and provide lots of material to discuss

Lesson 3 – Positioning and Timing

I mainly shoot sports images and so the discussion did focus on sports photography. Positioning and timing are key to generating high quality sports images. Two simple tips – images will be more compelling if you keen see the players faces, and if you can see the ball. Position yourself to capture both in your images.

Lesson 4 – Amateur Photographers Would Like to Know How to Generate an Income from Images

Regular readers of this blog will know that I have been active in stock photography. There are many posts on Beyond Here which discuss the process of shooting stock images and uploading them to an image library where they are then available to purchase. In our discussion on action photography I mentioned that many of my wildlife images are available as stock. This drew questions and was a good lesson for me – there are plenty of amateur photographers interested in how to generate an income from images. See here for what to expect starting in stock photography.

Positioning and timing are important in action images.

Lesson 5 – Photographers Like to Know About Your Equipment

While equipment was not a major component of the presentation, it did feature and drew some discussion. I briefly covered the equipment we use for sports photography and more generally for action images. You’ll find it easier if you have a camera body which shoots a high number of images per second, have lenses which focus quickly and shoot at shallow depth of field, and use a mono-pod if you are going to be shooting for an extended time.

Thanks for reading these 5 lessons from speaking to a local camera club. To Neil and the photographers at the Maroondah Photographic Society – thank you for having me!

Improving Stock Photography Results for Wildlife Photographers

Wildlife photography is a very competitive genre. It can be challenging to achieve returns from stock photography libraries. On the positive side, there is lots of demand for high quality wildlife images. If you can shoot a great portrait of a lion at sunset on an African tour you will likely be able to pay for your safari just from that shot. However, no matter what wildlife you are photographing, you are going to have stiff competition. I’ve written this post for the wildlife photographers wanting to make money via image libraries. Below are 5 tips for improving stock photography results for wildlife photographers.

emu

Animal behavior creates more interesting images than just the animal

Tip #1 Photograph Animal Behavior

An image of an emu standing still in the outback is not likely to be as compelling as the animal doing something interesting. In this image, the emu is drinking from a water hole. The quick movement makes this much more difficult to photograph than an emu walking or standing still. By its nature that makes this image more unique. Tip #1 look to photograph animal behavior.

wallabyTip #2 Cute Baby Animals Sell as Stock Images

I’m not sure you can have universal rules in stock photography.  If you can, it would be that baby animal images will sell. Look out for baby animals and try to photograph them at their cutest. There is a large market for these images and photographing baby animals is likely to bring you a stronger financial return than photographing adult animals.

fruit batTip #3 Look for Groups of Animals

Individual animals can be fascinating subjects, but groups of animals nearly always are. There is a natural chemistry that occurs as the animals interact and are aware of each other. This can make for captivating images as animals display individual and group behaviors. Look out for groups to help create interesting wildlife stock images.

lorikeetsTip #4 Focus on Color

Bright, vivid colors can help you generate interesting stock images. Here, the amazing colors of the rainbow lorikeet in Victoria, Australia add strength to this image. Vivid colors occur in many places in nature. Look out for color to add interest to your wildlife stock images. More interest equals more potential sales. And more sales is the way to buy your next lens.

Tip #5 Capture the Relationship Between Animals and Humans

Animal – human relationships occur with animals in the wild but more frequently with pets. The relationship between animals and their owner can produce great stock images. Next time that you can’t get away for a trip into the wilderness, consider whether you can generate images which show the animal – human bond closer to home.

horse on farmThanks for reading. Wildlife photography is a very competitive business. I hope these tips will help in improving stock photography results for wildlife photographers. For more reading please see 5 Tips for More Compelling Wildlife Images and 5 Tips for Making Images of Fast Moving Animals.

Shooting Wildlife Images Alongside Beyond Here Readers

Yesterday I had a unique experience – I was shooting wildlife images alongside Beyond Here readers. That’s a first! Bob and Rae are from California, USA and had read my post Favorite Wildlife Photography Locations. Looking back on that post, I wrote it in the first 3 months of Beyond Here. That’s a long time ago now, way back in mid 2014. It must have been meant for Bob and Rae as I even spelled ‘favorite’ with the US spelling!

Fruit bat

There is a large group of Flying Foxes at Yarra Bend Park meaning we could shoot a variety of images.

Background

Bob and Rae contacted me a few months ago. We shared ideas on good wildlife photography locations for their trip to Australia. I made some suggestions for Melbourne and around Victoria, keeping in mind that transport can be tricky when you are in a foreign country where the locals drive on the opposite side of the road!

Fast forward to this week. They arrived last Sunday and contacted me by email. By chance, I had a fairly light week planned and had time to join them at Yarra Bend Park to photograph the large group of grey headed flying foxes which roost there. How cool. Shooting wildlife images alongside Beyond Here readers from the US.

Fruit bat in mid airYesterday’s Shoot

We spent a few hours exploring the park and shooting images of the flying foxes. Bob found it a unique experience as he is used to small bats, not large flying foxes. The grey headed flying foxes are active during the day, so Bob was able to get a range of images. That included everything from bats hanging upside down sleeping in the trees next to the river, through to groups of them in flight.

We had a lot of fun and it was unique to be shooting wildlife images alongside Beyond Here readers. (It also helped Bob justify bringing his 200-500mm lens on a 16 hour flight to the other side of the world! You know you love your photography when you can justify that!)

The Wrap

It was a lot of fun meeting Bob and Rae and showing them around one of my favorite wildlife photography spots. It never occurred to me that writing Beyond Here back in 2014, I’d some day be shooting wildlife images alongside Beyond Here readers from the other side of the world just 15 minutes from my home.

fruit bat flying

Grey headed flying foxes have a large wing span

Bob and Rae are in Melbourne for another few days before exploring parts of New South Wales and Queensland. To you both, thanks for making time to say hello and explore Yarra Bend Park together. I hope your images from yesterday are good, and that you have a great time in Australia.

Thanks for reading shooting wildlife images alongside Beyond Here readers. Happy shooting.


Would You Give Your Images Away for Free

Every once in a while I receive an email asking to use one of my images for free. This happened earlier this week. The email was from a conservation organisation doing work to protect endangered species of animals. The request was to use one of my tree kangaroo images. I wonder, would you give your images away for free?

Here’s what happened

The email request provided me a link to the organisations website. I’m interested in issues around conservation so I took time to check out their site. They seem to be doing good work, and certainly had a very functional and well presented website.

tree kangaroo

This is a Goodfellows Tree Kangaroo. I don’t know if this is the image they were referring to.

There were 2 interesting things about this request:

  1. All my requests for free use of images come from animal welfare and conservation organisations. That may be because I have a lot of animal images available through image libraries. Or it may be that they have found that asking for ‘free use’ often gets a positive response, and they can save money this way. Who knows?
  2. They didn’t attach the image they wanted to use. Most requests do include the image they have found and want to use. I’m not sure if I’m too cynical, but this makes me suspicious. I do wonder whether this was a genuine request from an organisation doing good work, or was a copy and paste effort sent to hundreds of photographers?

So, my dilemma was what to do. Would you give your images away for free?

My Views

I have come across this situation before, and my opening stance is not to give images away for free. It’s not in my interests, and it’s not in the interests of other photographers. I have made exceptions in the past, but my opening position is that the user should be paying for images.

My Response

Here is my email response:

“Hi XXXXXX,

Thanks very much for your email. I checked out your website – congratulations on the fantastic work you are doing.

It’s good to hear you are going to feature the Goodfellows Tree Kangaroo. I follow the conservation efforts for them, particularly the work XXXXXX are doing with communities in Papua New Guinea.

In terms of images – I’m glad to hear you like one of mine. I hope you’ll understand that as a professional photographer I rely on royalties from licencing images to support my family, so I can’t provide it for free.

That said, I have many tree kangaroo images available to licence very inexpensively on iStockphoto. This link will take you there XXXXXXXXX

It should display prices in the local currency where ever you are. In Australian dollars it costs $13 for an individual image. If you need multiple images look at the one month subscription which lets you download 10 images for $40 (you can cancel after one month if you don’t have ongoing image needs).

I hope this helps.

Very best wishes for your work. I’ve signed up for the email updates and will look forward to the piece on Goodfellows Tree Kangaroos.

Regards

Craig”

money theme

Subscription programs make stock images affordable. I felt I did the right thing introducing this organisation to an image library where they can licence images cost effectively.

How would you handle this situation?

I feel like I’ve done the right thing by myself and other photographers. I also hope the organisation feel I’ve done the right thing by them – by introducing them to a cost effective way to licence images. The final piece of this story is just to add that my reply was sent 5 days ago. I haven’t had any response.

What do you think? Would you give your images away for free?

Shooting Moving Objects

Over the last 2 months I have been working with 5 other photographers to build a new image library. I didn’t know the photographers before we started the project, and it has been fun and challenging to work with them. One area that has become clear is that there is room for improvement in shooting moving objects. I have ‘grown up’ shooting sports and wildlife and selling prints. In that environment the images have to be in sharp focus. The 5 photographers are all younger than me and have ‘grown up’ in the era of Facebook and Instagram where there is less importance on fundamentals like having the image in really sharp focus. So here are a few pointers for shooting moving objects.

Focus Mode and Focus Point

Below is a straightforward lifestyle image of a woman walking across the road. This image can be very boring if she is standing still. Having her moving adds an energy to the image. So how do we maximize the chance of having her in sharp focus? Firstly we shoot in continuous focusing mode. I use Canon equipment, so on my Canon camera bodies that is AI Servo mode.

woman walking

Use continuous focus mode and a single focus point to maximize your chance of a sharply focused image

Choose a single focus point to tell your camera where the focus should be. In this case I pre-selected this point before we walked across the road, and I aimed it at the model’s eye closest to the camera.

Shutter Speed, ISO, and Depth of Field

For the shot above I wanted to blur the people in the background so I shot at f2.8. It was an overcast but bright morning, so I used ISO400. I knew at this ISO and f2.8 it would mean I could keep a fast shutter speed which again helps keep sharp focus in the image. The shutter speed in this image was 1/1600s.

In older DSLR bodies I would be very careful about raising the ISO as it would result in grain in the image. But with modern DSLR’s this is not a concern, and is not a consideration at ISO400.

What Shutter Speeds Should You Work With?

The answer to this question is to practice extensively. I know from taking thousands of images of moving objects what shutter speeds maximize the chance of a sharply focused image.

Of course the speed the object is moving has an impact on what shutter speed you will need. Again, from experience, I know that in the case of the image above any shutter speed at 1/400s or faster will give me a good chance of a sharply focused image.

Woman crossing

An image like this will have greatest chance of being in sharp focus if you shoot at 1/400s or faster

In the case of kids sport – I have shot many basketball games and know that 1/800s might not give me sharply focused images when the kids are running at full speed. At 1/1000s or faster I have a much better chance.

And for fast moving wildlife like the grey headed flying fox below, I’ll be aiming to shoot at 1/1600s or faster.

Shoot A Single Frame or Multiple Frames?

Like everything in photography (!) the answer is up to you. I like to shoot multiple images to give me choice among the images and as ‘insurance’ if one shot is out of focus. I shoot images of fast moving objects in burst mode and shoot 3 or 4 images each time.

Flying fox

This image was shot at 1/2000s to freeze the action of this fast moving flying fox. It was shot in burst mode.

If you are serious about your photography and committed to producing sharply focused images you’ll need to master shooting moving objects. Think for a moment about the possible scenarios – sports, live music, lifestyle portraits, stock, wildlife, wedding, events. The list goes on. If you can’t shoot moving objects well you are going to significantly reduce the options for earning money from your photography work.

I hope these quick pointers will help you with shooting moving objects. Next step – lots of practice! Happy shooting.

Five Lessons From Fine Art America

This week I had a sale of a print on Fine Art America. It was one of the extensive range of images I have shot of grey headed flying foxes. The image itself shows the animal flying in mid air with the sun showing the veins in its wings. It’s a cool image, and it will look great as a large print for the US based buyer. I have written lots of posts for Beyond Here about stock photography, but very little about my experience with Fine Art America. Here are five lessons from Fine Art America.

Flying fox

This image is similar to the one which sold on FAA this week. A magnificent animal with the sun shining through its wings

What is Fine Art America? FAA is a website where artists can post their work for sale. Unlike stock libraries where buyers purchase the electronic image and a licence to use it, on FAA the buyer is purchasing a print or other physical product. FAA works with printers and other product manufacturers around the world to produce the final product and ship it to the buyer.

So here are my five lessons from Fine Art America.

Lesson 1 – You need to promote your own work. FAA has not been a source of significant income for me as I’ve treated it like an image library – in that I upload my content and expect the buyer to do the rest. In my experience those who are doing well on FAA are actively promoting their content. They are adding links to their social media feeds and encouraging followers to check out their content. So the lesson is that you need to promote your own work, don’t rely on FAA to do that for you.

Lesson 2 – Set your own prices. One of the key differences between FAA and image libraries is that on FAA you can set your own prices. That means you can determine the margin or amount of money you want to make on each sale. FAA has a well organised back end system where you can set prices for individual files or for groups of files. If you intend to make a significant income through FAA it is worth investing the time to price your content appropriately.

flying bat

Grey headed flying fox in mid air

Lesson 3 – Income per sale will be high. While I don’t have a lot of files on FAA each sale represents a reasonable sized income. In the case of this week’s sale (I only had the one sale on FAA this week!) the income from this one sale is the equivalent to 30 sales of my stock images. So while the number of sales is lower, the income per sale is high.

Lesson 4 – There is still a market for prints and other physical products. It’s nice to remind ourselves once in a while that the era of physical products is not dead. People still want prints to hang on the walls of their homes or office, and increasingly there is a market for new physical products. (Before this print sale, my previous 2 sales on FAA were for smart phone covers.)

Lesson 5 – You need to continue to add new content. Just like a stock photo portfolio you can’t expect a growth in income without adding new content. I haven’t been very active in adding to my FAA portfolio and this is reflected in low levels of income. To state the obvious, to grow your income stream you need to keep adding new content.

fruit bat

Grey headed flying fox carrying it’s baby

My income from FAA is far below my income from stock images. (For background on stock photography please see Why I Shoot Stock). Having a nice big sale this week was a useful reminder of the potential of FAA as a sales outlet for photographers.

Do you contribute to FAA? What has been your experience?

Thanks for reading five lessons from Fine Art America. Happy shooting.

5 Tips for More Compelling Wildlife Images

Wildlife  photography is a hugely popular field for both amateur and professional photographers. Here are 5 tips for more compelling wildlife images.

Pademelon

Look for pairs of animals to add a new dimension to your images.

Tip 1 – Look for Pairs of Animals. Solo portraits of animals can make compelling images, but pairs of animals add a new dimension. There is the relationship between the animals and the interaction between them. Look out for pairs of animals.

Koala

Baby animals are great subjects for wildlife photography

Tip 2 – Photograph baby animals. If you want people viewing your images to “ooohh and aaahh” then build a gallery of images of baby animals. There is something about the cute, vulnerability of baby animals – as well as the connection with the parent that is guaranteed to create compelling images. Koalas, like in this image, spend the first few weeks of their life in their mothers pouch. When they become too big, they are transported on their mothers’ back. This period is an ideal time to shoot images which include both mother and baby. Inevitably the baby will be looking small and cute, and mum will be alert in protecting her young one.

Flying fox

Animals in action. A flying fox carrying its baby.

Tip 3 – Look for animals in action. Animals in action, engaging in natural behavior are always more interesting than animals doing nothing. This is particularly why you get very different types of images when you photograph animals in the wild compared to animals in captive environments such as zoos.

In this image, the grey headed flying fox is flying through the air. If you look very closely you can see that it is carrying its baby at the same time. The baby is clinging to its mothers’ chest and will continue to do this until it is large enough and strong enough to fly alone. This image also emphasizes one of the key features of this animal – the spooky vein structure which is visible in the wings. When you are planning your wildlife shoot, consider what feature of the animal you are photographing you want to highlight.

Duck

A very low angle makes a compelling image of a common animal

Tip 4 – Shoot from unusual angles. Ducks are very common birds where I live in Melbourne, Australia. In creating compelling images of common animals, look for different angles to shoot from. In this case I lay down at the edge of the lake, to shoot an image from the duck’s eye level. For more about this shoot, please see this post.

Tree kangaroo

The Goodfellows Tree Kangaroo is an endangered species from New Guinea

Tip 5 – Photograph unusual wildlife. Unusual wildlife make compelling images. This image is a Goodfellows Tree Kangaroo. They are native to New Guinea and are now an endangered species. Images like these are compelling, not only for the beautiful colors of the animal, but also because most people will never have seen this animal. Look for unusual wildlife for more compelling images.

Thanks for reading 5 tips for more compelling wildlife images. Good luck with your wildlife photography.

5 Tips for Making Images of Fast Moving Animals

This morning I visited one of my favorite wildlife photography spots – Yarra Bend Park in suburban Melbourne, Australia. It is about 20 minutes from where I live and has a colony of thousands of flying foxes. If you’d like more details about where to find Yarra Bend Park, please see this post.

I was there for about 1 hour and made a wide range of flying fox images. Here are 5 tips for making images of fast moving animals.

Flying Fox

Fast shutter speeds are required for fast moving animals

Tip 1 – Continuous Focusing Mode

When an animal is moving quickly, getting it in focus is key to a successful image. Use continuous focusing mode on your camera to track the animal as it moves, and to give you the best chance at an image in focus.

Flying Fox

Increase ISO to help with fast shutter speeds. This shot was taken at ISO400.

Tip 2 – Increase the ISO

To allow a fast shutter speed you may need to increase the ISO setting on your camera. In the images posted here the ISO ranged from 400 (for the images shot against the cloudy sky) through to 1250 where I was shooting against a dark green background.

Tip 3 – Fast Shutter Speeds

The combination of continuous focusing mode, ISO, and fast shutter speed will give the best chance for sharply focused images. In the flying images here I have used 1/2000s for the majority of these images.

Tip 4 – Expect Lots of Failures

When animals are moving quickly you will have a large number which are out of focus or not well composed. Don’t be upset, this is normal in wildlife photography. You will find that your percentage of good images increases with practice.

Flying fox

Be alert for the opportunity to shoot strong images when the animal stops

Tip 5 – Look for Strong Images When the Animal Stops

It can be tempting to only shoot the animal as it is moving. Resist this urge, and create some very different images when the animal stops. The flying foxes roost in the trees given an excellent opportunity for images as they hang upside down.

Thanks very much for reading 5 Tips for Making Images of Fast Moving Animals.

Flying fox

Practice will increase your percentage of successful images.

Shooting at Eye Level

Want to add more interest to your wildlife, nature, or children’s shots? Shooting at eye level will do it. The alternative is to shoot down on to your subject. While that downward view is the one we see most often with our eye, shooting at your subjects eye level is almost always the more interesting shot. This technique works particularly well with wildlife, children, and flowers. It can take time and effort to get down to your subjects level but it will be worth it for the unique angles and improved shots.

Here are 3 examples.

Duck on lake

Shooting at eye level here meant lying on the ground

In this image of a duck paddling across a lake it was tricky to get down to the duck’s eye level. To make this shot I lay face down on the ground to get a “duck’s eye” view. People walking past would have thought I looked a little strange (!) but I achieved a series of interesting wildlife images – all taken from a duck’s eye point of view. It was a calm day and the reflection was a bonus.

In example two, a child on his father’s shoulder, it was much easier to shoot at eye level. For this shot, the father was holding the son on his shoulder trying to calm him down. Rather than being ‘down time’ in our family portrait session, it was a great opportunity to shoot an eye level portrait of the child. And briefly he stared directly at me. Nice one.

Child

Shooting at eye level will add interest to children’s portraits

Example 3 are tulips. Rather than shooting down from above flowers, try getting down very low and using the sky as your background. It eliminates a muddy, dirty background and replaces it with a blue plain background which highlights the color of the flowers. It isn’t strictly ‘shooting at eye level’ but it is a very different angle than shooting down from above. It can be challenging to shoot flowers differently – but getting down very low is a great place to start.

Tulips

Shooting flowers from a very low angle can create unique images

Shooting at eye level often produces outstanding images. Keep this in mind next time you are shooting wildlife, children or flowers.


Framing for Impact

In the first 7 months of Beyond Here I haven’t posted often about photography techniques. I’ve assumed people running or preparing to run photography businesses have most of their technique sorted. But I had two emails this week from readers who have asked for more content on technique. It seems a light refresher is welcome. So today I have been looking through images where framing plays a role. Within those images I was looking for images where there is a strong sense of framing for impact.

Framing

Here, trees are used to frame the island sunrise

This image was taken at Hahei Beach on the east coast of New Zealand. It was shot in the early morning just before the sun came up. It is a good example of framing for impact. While the pre dawn light was beautiful, the framing from the trees helps take away a lifeless sky, and focuses attention on the island and sunrise.

How do I see opportunities for framing? There are lots and lots of opportunities to use framing in your images. In this case, while I had walked along the waters edge and made some images, I knew the stronger images would be made from further back from the waters edge. Then it was just a matter of finding the right tree to really deliver ‘framing for impact’.

Giraffe

Even wildlife portraits can using framing for impact

Where else can I find opportunities for framing? Once you train yourself to look for them, you will see many opportunities for ‘framing for impact’. I shoot weddings, and classic scenes for ‘framing for impact’ are the bride and groom framed by the church door, or the bride framed by the window of the bridal car. These are good opportunities to add impact to your wedding images. I also shoot family portraits. When shooting an outdoor session with kids, I often use a playground to do portraits. Within most playgrounds you will find something to frame the child and add impact. Check out the venue in advance to plan this shot. It might be a swing, or the top of the slippery slide. The shot shown here is a giraffe in captivity. The nature of wildlife photography can make it harder to use framing for impact, but once your eye is trained you will start to see these opportunities even in fast changing situations.

Thanks for reading ‘framing for impact’. I hope it has been useful to you. If you would like to receive regular emails from Beyond Here, please add your details in the box in the margin of this page. Thanks again for reading, and if you need a place to get away from it all – Hahei on the east coast of the North Island of New Zealand is a great place!