Tag Archives: photography tips

Better Backgrounds for Better Images

Better backgrounds

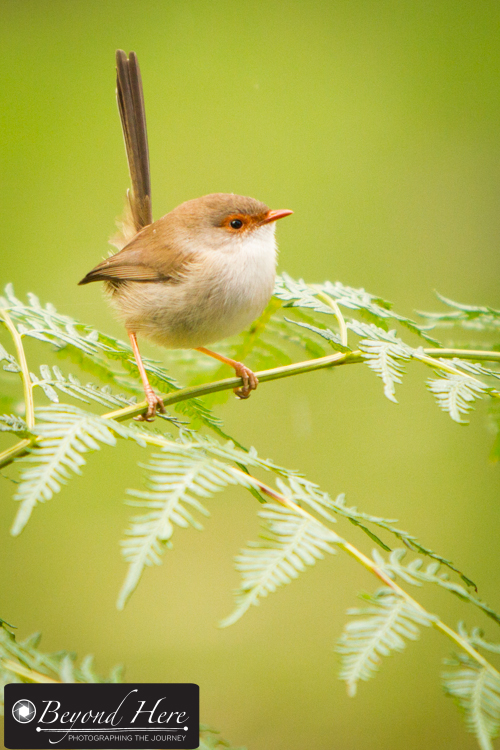
A clean background has added impact to the subject

This photo was selected as the file of the day on one of the wildlife photography communities I participate in on Google+. It is a female superb fairy wren. I took this shot yesterday afternoon in Melbourne, Australia. It has prompted me to write about what is the single biggest way to improve your photography – better backgrounds for better images.

This tip is applicable to nearly every type of photography – and on this post I have included sample images from weddings, wildlife, sports, and family portraits.


In all these types of photography, having a nice clean background has focused attention on the subject. There is nothing distracting or off putting, and the subject really stands out in the frame. So, let’s see some sample images, and discuss how to use better backgrounds for better images.

Better backgrounds

A clean, bright background focuses attention on the subject

This example is from a family portrait shoot. In any type of photography where you are setting up the shot, getting nice clean backgrounds is straight forward but requires the photographer to choose the type of background suitable to the shot. In this case, I was doing an outdoor family portrait session at a park. The child was wearing dark colors so I looked for a plain background which also had lighter colors. In this case, the background is a stone wall which formed part of a monument. It is a nice bright color which offsets the subject’s dark shirt, and provides a clean but textured background. At a park environment, also look for trees or nature scenes which would give clean backgrounds, or fences or building walls. These can all be effective.

Better backgrounds

An outdoor stairwell as a background for a wedding image

Ok, now for a wedding image. This image was taken at an inner city wedding. As you can see I have used an outdoor stair well as the background for this image. Weddings are particularly important to get clean backgrounds, as the focus needs to be on the couple, their relationship and the wedding day.

Again, with weddings you have time to plan these images in advance, and as long as the weather cooperates, it is a matter of following your plan. In this image the lack of color in the stairs also helps to focus attention on the bride and groom. (Interestingly, this image had more impact because of the colors than a similar black and white image.)

Even in inner city, busy environments with lots of people, it is possible to find clean backgrounds to support your images. Look for stairwells, doorways, arches, or architectural features – like walls. Better backgrounds for better images works for wedding photography too.

Freezing motion

Freezing motion in indoor lighting conditions will require higher ISO

The use of plain backgrounds in sports can be effective, but there are also times when a busy background works well in sports photography.

If you think about a basketball image, there is a time to have the player on there own, and also a time for the player to be seen against a background of a cheering crowd.

In sports photography, it is still possible to get clean backgrounds, but it also might be more effective to get a busy background of a cheering group of supporters.

Ok, so how do we put the lesson of better backgrounds for better images into action? To improve your photography with this technique it is a matter of consciously choosing what you would like for your background and then practicing. After a short period of time you will be subconsciously positioning yourself and your subject to achieve backgrounds which help your subjects stand out.

If you have found this post – better backgrounds for better images – useful, you may also like posts on:

Thanks for reading this post. Good luck with better backgrounds for better images.


Getting Started in Your Photography Business

Today I swapped Facebook messages with a very enthusiastic photographer who has visions of a career change and making a living from travel photography. Her enthusiasm coupled with a healthy dose of “where to next doubts” reminded me of myself when I was starting out in 2008. It prompted this post – getting started in your photography business.

Financial Planning

Plan for your financial success.

Lots of people dream of turning their hobby into their source of income. It is all about “living the dream” and reminds us that “if you do what you love, you’ll never work a day in your life”. Cool! But getting started in an industry you may have very little experience in is a daunting challenge. So, I’ve thought about what I’ve learned over the last 6 years. Here are 7 tips if you are planning on getting started in your photography business.

Tip 1 – Capitalize on Your Enthusiasm

The early stages of starting a business are very exciting, you are full of enthusiasm and enjoying the new challenge. Capitalize on your enthusiasm! Act on it, get started, do something.

There is a hugely empowering feeling that comes with taking action – get started, and get started now! Organise a website, join a stock photography website, shoot a pile of new images, write an advertisement for yourself, find an online community to join. Whatever it is, act today. Get started.

Tip 2 – Expect Mistakes

As you start in an industry you don’t know, you are not going to get every step right first time. Expect mistakes, they are part of the learning. When they come, welcome them. This is how we move forward. I started out with a horrible website and expected that to get lots of visitors, and then get lots of clients. That’s not how it works. The mistake and the lesson are both ok. Learn the lesson and move forward.

Tip 3 – Ask for Advice

If you want to reach your goals slowly – do it your own way, don’t ask for input, and refuse to take advice. If you want to reach your goals more quickly – ask for advice from people who’ve trodden this path before you! As a photographer, ask for advice both on your images and how to market your images.

The bad news is that making images and marketing images are entirely different skills. The good news is that the photography industry is full of people who will share their experience and help you. All you have to do is ask.

E business

Today there are a wide variety of ebusiness opportunities

Tip 4 – Be Prepared to Learn

Asking for advice is the first step. Being prepared to learn is the next. Running a successful photography business is both a journey of self discovery and a process of continuous improvement. Whether its learning a new lighting technique, understanding how e business works, learning about stock photography, getting better ways to pose your subject, or knowing how to improve your post production workflow – be prepared to learn. Keep improving. Then improve again. And again. And again.

Education

Research your target market

Tip 5 – Research the Market

Right when you start you are full of energy but without direction. This is a great time to study the market.

If you are a travel photographer, what are successful travel photographers shooting? What style of images are popular? How are they lit? Why do they work? If you are a stock photographer – what are the current trends in stock photography? What are the next emerging markets? What is the under served niche you can target? If you are a wedding photographer, how are the best wedding photographers in your area marketing themselves? What style of images are they shooting? Why does it work? Is there an opportunity for you?

Use some of your new starter energy to see what the market is doing.

Tip 6 – Plan your Finances

Starting a business means generating an income – and having an income higher than your expenses as soon as possible! It is very easy to get carried away with the romantic notion of being a photographer, and not bother to look at your income and expenses. When you are starting out, you are setting the principles you will run your business on forever. You need to look at both expenses and income and assess how well the business is going. Happy clients is one thing, a happy accountant is another. Keep it real.

Tip 7 – Keep Going!!

You will run into road blocks, you will get discouraged, you will have doubts. When you get to the point of being about to give up – this is the time to keep going! If this were easy, everyone would do it. There is something special in overcoming difficulty to arrive at success. The journey makes you better – keep going!

There are hundreds of other lessons learnt in starting a photography business. Please leave a comment on this post if you have an issue you’d like me to address, a question you’d like answered, or just some encouragement!

Finally, the lady I swapped messages with today has already found a community of photographers, she is asking questions, and listening to the answers. If she can keep that up, and keep going when she has doubts, she will do very well.


Freezing Motion

Freezing motion is a photographic technique to capture what the human eye cannot see. It is particularly effective in wildlife and sports photography. So what do we need to do to freeze motion, and how can we use this?

To be effective in freezing motion we need to use a fast shutter speed. To achieve this we may need to use a high ISO depending on the lighting conditions. How fast does the shutter speed need to be? That depends on how quickly the subject is moving. Let’s look at some examples of freezing motion.

Freezing motion

Freezing motion in indoor lighting conditions will require higher ISO

Indoor sporting settings are particularly challenging for freezing motion. The low levels of lighting will mean higher ISO settings are required to get fast shutter speeds. In this image the settings are ISO4000, 1/500s, f2.8

In this case the player has just set off from a standing start. For this shot 1/500s has been fast enough to freeze the action. If he was running full speed we would need a shutter speed of 1/1000s or faster to freeze the motion.

Black swan

Freezing motion is very effective in wildlife photography

Example two is a black swan. This image was taken at Albert Park Lake in Melbourne, Australia. The outdoor setting and brighter lighting means we can use lower ISO, though we still need fast shutter speeds to freeze the action. In this case the settings were ISO100, 1/1600s, f2.8.

The bright sunny conditions means I have been able to use ISO100 and 1/1600s to freeze the action. Smaller, faster wildlife will require fast shutter speeds than these. To achieve focus, I have selected a single focus point and focused on the swan’s head. In the sports examples, I have used the same technique. Choose a single focus point and focus on the player’s head.

Freezing motion

Freezing motion in sport is straightforward in well lit conditions

In example three we have a player running towards first base. The brightly lit outdoor conditions mean we can achieve fast shutter speeds with lower ISO’s. In this case the ISO is 200 and the settings 1/1000s and f4.5. Again, for faster moving subjects, higher shutter speeds will be required.

How might we use the techniques for freezing motion? The sports examples show you that action images are no longer reserved only for professional sports people. With today’s camera technology and these techniques it is possible to create action portraits in local, amateur sports too.

In example four, we have a cassowary. These very large, impressive, flightless birds are difficult to photograph. Being ready with the techniques outlined in this post, meant that when this cassowary moved its head in an unusual way, I was ready to capture a unique portrait. In this case the settings were ISO500, 1/200s, f2.8. The slower shutter speed was effective here because these large birds move relatively slowly (except when they are running!!)

Cassowary

Be ready with a fast shutter speed, and a single focus point

For success in freezing motion, keep your shutter speeds high, and use a single focus point. 1/500s will work successfully for larger, slower moving subjects – and 1/1600s and faster for smaller faster moving subjects.


Newborn Photography Some Easy but Essential Tips

Newborn Photography some easy but essential tips is a guest post from Renate Hechter. Renate is the owner and operator of Pure Dynamics Photography in Sydney, Australia. You can find out more about Renate and Pure Dynamics Photography on the Beyond Here contributors page.

Newborn

Keep your newborn warm and well fed. Copyright Renate Hechter

Newborn photography some easy, but essential tips.

Thank you Craig for the opportunity to write a guest post on Beyond Here.  I am a family photographer, but love newborn photography best of all. It is such a privilege to be able to capture those early moments in the first few weeks of a baby’s life. It will be a keep-safe for the family and the baby in years to come.

When I tell people I do newborn photography, I often hear them gasp, “Wow – how long did it take to get that shot, must have been hours? You must be some sort of baby whisperer!”.

Of course I’m not! It may have helped that I have 4 small children and therefore have had to deal with 4 newborns at some point.

Rather like dealing with your own family, newborn photography is all about planning and preparation. Here are some easy, but essential tips that you can follow if you want to capture the first few weeks of a precious little one’s life.

  1. Make sure baby is safe

Safety, safety SAFETY!! You will need a baby spotter and mum usually works best.  They need to be clearly briefed as to their responsibility – they are to watch their baby and preferably keep a hand on baby at all times before the shot – looking out for hazards such as rolling off the baby posing beanbag.

  1. Newborn

    Take your time with newborn photography. Copyright Renate Hechter

    Make sure baby is fed

Really stress to the parents that baby is fed and burped before arriving and is coming to see you in their normal sleep time. You may want to get the family to arrive slightly early for their session, so mum have the opportunity to give baby a quick feed again, if necessary.

  1. Make sure baby is warm

Make sure where you take you photographs are toasty warm so the baby does not get cold – especially if you are taking pictures of naked or semi-clad babies. Turn the heating up to around 25 degrees C or use a directional heater. If using a directional heater, make sure you keep it far enough away from the baby’s sensitive skin.

The next few tips involve four S’s for helping to settle a newborn into a pose;

  1. Swaddling

Invest in a number of stretchy baby wraps.  They can be used successfully for babies who struggle to be settled straight away. Shoot your swaddling poses first if that’s the case.

  1. Shushing (or white noise) 

There are a number of smartphone and computer apps that you can download for white noise – turn up the volume – that is very effective for baby, and I find that it also relaxes the adults.  Relaxed parents mean a relaxed baby.

  1. Sucking

Have a dummy/soother ready and make sure you communicate this with the parents beforehand.  Some parents have dummy fear, but using a dummy to settle baby in the pose and then taking it out just before you take the shot works well.

Baby suckling

Use a dummy or soother to calm baby. Copyright Renate Hechter

7. Sidelying or stomach position

Almost miraculously, a lot of baby poses are in tummy or side-lying position.  Babies do love those positions and will often settle and fall asleep.  Keep a firm hand on baby in those positions, as that will aid them falling asleep.

8. Take your time

Add a good dose of patience into the mix. The newborn should be fast asleep when you attempt your poses, and that may not happen immediately.

9. Keep mum calm

Explain the process to the mum.  A calm and relaxed mum often means a calm baby.

Newborn

Newborns allow you to position them. Copyright Renate Hechter

10. The younger, the better

The best time to photograph newborn are between day 5 and 20.  During this time period, they tend to sleep a lot (especially if they are fed well). Your can also get them into those wonderfully squishy positions.

And last, but not least – Safety again!

So important, it’s worth mentioning twice.

Do not forget to enjoy your session!

Making Unique Portraits

In this post we look at an example of making unique portraits without spending hours in post production.

For this stock photography shoot, the model had very long red hair. We decided to make a feature of her long hair, to make an interesting and unique series of images.

Unique portrait

A unique portrait created using fishing line and parental support

How did we set about making these unique portraits? For the first portrait, we took her plaited hair and attached several pieces of fishing line at different intervals along the length of her hair. Her parents stood on each side of her, holding the fishing line. Then it was a matter of raising or lowering the different sections to achieve the wavy pattern. The total time to shoot this image was about 15 minutes. That consisted of preparing the fishing line, attaching it, and then taking a series of images to get the right look. What about post production? There were small parts of the fishing line visible in her hair and against the white background. These took about 5 minutes to remove in post production. There you have it, making unique portraits version one.

For the second image, the idea was similar, but the execution was different.

Unique studio portrait

Unique portrait created using a coat hangar threaded through her hair

In this case, we unwound a wire coat hanger, and threaded it through the models hair. This time, her hair was in a single plait. This made it possible to create more solid shapes out of her hair – in this case a large question mark. Once the shape was formed in the hair, again a parent held the coat hanger – which protruded from her hair. This one took longer to make. The coat hangar had to be threaded through the models hair, then shaped appropriately, and then the images taken. This took approximately 30 minutes and I was grateful for a very patient model. Again, about 5 minutes was required in post production to remove the coat hanger and parents hand which were visible in the corner of the shot.

There you go,  making unique portraits without spending hours in post production.

If you have found this interesting, you may be interested in these related posts:

Do you have a story to share about creating unique portraits? Please add a comment to this post.

Look for Baby Animals

Wildlife photography tip – if you want your friends to ooohhhh and aaaaahhh at your wildlife pictures, look for baby animals. It is the baby animals which get the “isn’t it cuuuuuute!” reaction.

Below are four examples of baby animals, the stories that go with them, and some technical data on each shot. These are all Australian wildlife.

Show me the samples!

Image #1 – Baby Koala

Koala and joey

Koala carrying its joey

Baby koalas are called joeys. They ride on mums back until they are too big. It makes for a great photograph when you can get the mother and baby both in the frame. This is relatively easy with koalas as the baby rides on mums back. Look for baby animals!

This image was taken in Queensland, Australia in the late afternoon. Koalas sleep for up to 20 hours per day. When they are awake, you can get a variety of shots in a short period of time. This shot was taken as it moved to another part of the tree to feed. The sun had set and so this was taken with quite slow shutter speed 1/60 sec at f4.

Image #2 – Baby Emus

Emu chicks

Emu chicks

Emu chicks can be challenging to photograph as mum won’t let you get close to them. She will stay near to them for protection.

They have the beautiful striped camouflage you can see in this image and are really cute.

To make this image I sat on the ground. This helped the adult emu know that I was no threat to her and her chicks. They proceeded to stroll all around me, and I was able to make a series of interesting images. Even though they are small, they rarely stay still. To get them nicely in focus you will need a higher shutter speed. This shot is 1/1250 sec at f4.5.

Image #3 – Bush Stone Curlew Chicks

Baby curlews

A bush stone curlew and its chicks

Bush stone curlews are common in the western suburbs in Brisbane, Australia which is where this image was made. They have an unusual behavior – when they feel threatened they stay completely still.

This does make them easy to photograph and you can get relatively close if you move slowly. Their chicks also have a similar striped pattern to the emus in the sample above. Very cute. Look for baby animals! This image was shot at 1/1250 sec at f3.5.

Image #4 – Kangaroo Joey

Kangaroos don’t generally let you get too close when they have young joeys who are out of the pouch. This one is big enough that it could easily have hopped away very quickly on its own. That might be the reason they both let me get relatively close – this shot was taken with a 70-200mm lens, 1/400 sec at f4.5

Kangaroo and Joey

Female red kangaroo and its joey

I love the look on the joey’s face as it peeks out from behind mum! If you want your friends to oohhh and ahhhh at your wildlife pictures – look for baby animals.

The koala and kangaroo images here are good examples of filling the frame with the subject for maximum impact. I wrote an earlier blog post on that topic to give your images greater impact.

What are your favorite baby animals to photograph?