Tag Archives: stock photography

Improving Stock Photography Results for Wildlife Photographers

Wildlife photography is a very competitive genre. It can be challenging to achieve returns from stock photography libraries. On the positive side, there is lots of demand for high quality wildlife images. If you can shoot a great portrait of a lion at sunset on an African tour you will likely be able to pay for your safari just from that shot. However, no matter what wildlife you are photographing, you are going to have stiff competition. I’ve written this post for the wildlife photographers wanting to make money via image libraries. Below are 5 tips for improving stock photography results for wildlife photographers.

emu

Animal behavior creates more interesting images than just the animal

Tip #1 Photograph Animal Behavior

An image of an emu standing still in the outback is not likely to be as compelling as the animal doing something interesting. In this image, the emu is drinking from a water hole. The quick movement makes this much more difficult to photograph than an emu walking or standing still. By its nature that makes this image more unique. Tip #1 look to photograph animal behavior.


wallabyTip #2 Cute Baby Animals Sell as Stock Images

I’m not sure you can have universal rules in stock photography.  If you can, it would be that baby animal images will sell. Look out for baby animals and try to photograph them at their cutest. There is a large market for these images and photographing baby animals is likely to bring you a stronger financial return than photographing adult animals.

fruit batTip #3 Look for Groups of Animals

Individual animals can be fascinating subjects, but groups of animals nearly always are. There is a natural chemistry that occurs as the animals interact and are aware of each other. This can make for captivating images as animals display individual and group behaviors. Look out for groups to help create interesting wildlife stock images.

lorikeetsTip #4 Focus on Color

Bright, vivid colors can help you generate interesting stock images. Here, the amazing colors of the rainbow lorikeet in Victoria, Australia add strength to this image. Vivid colors occur in many places in nature. Look out for color to add interest to your wildlife stock images. More interest equals more potential sales. And more sales is the way to buy your next lens.

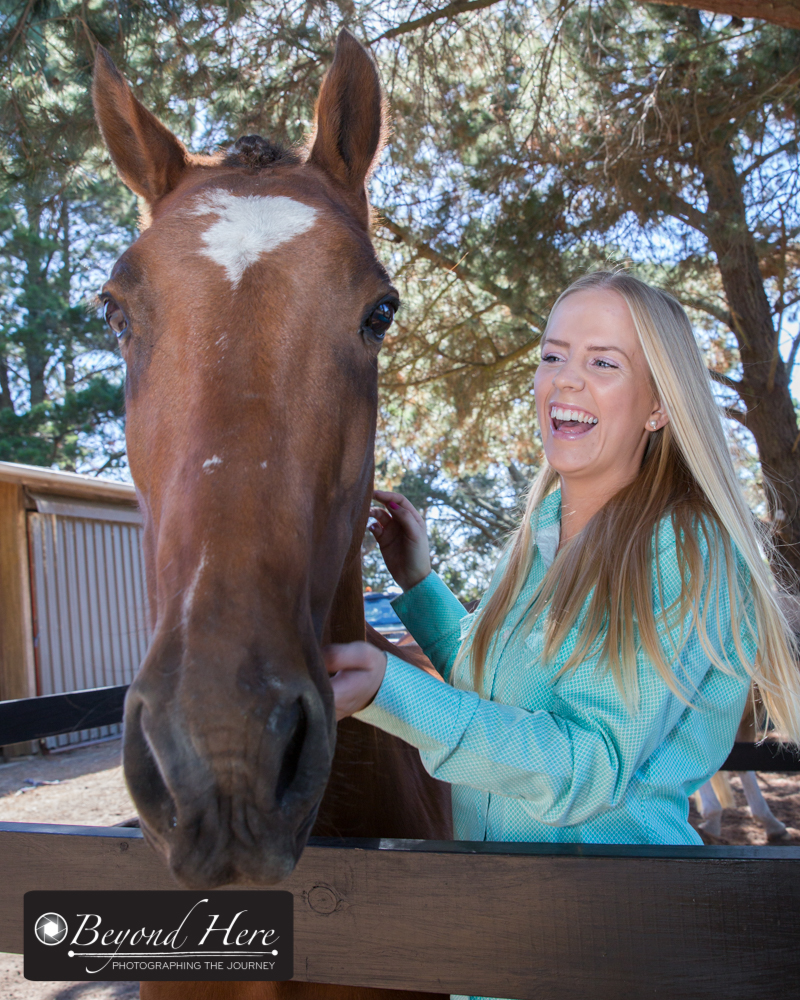
Tip #5 Capture the Relationship Between Animals and Humans

Animal – human relationships occur with animals in the wild but more frequently with pets. The relationship between animals and their owner can produce great stock images. Next time that you can’t get away for a trip into the wilderness, consider whether you can generate images which show the animal – human bond closer to home.

horse on farmThanks for reading. Wildlife photography is a very competitive business. I hope these tips will help in improving stock photography results for wildlife photographers. For more reading please see 5 Tips for More Compelling Wildlife Images and 5 Tips for Making Images of Fast Moving Animals.

How to Ruin Potential Sales

Lately I seem to be particularly sensitive to poorly targeted promotions which leave me feeling like a number rather than a client or partner. I’ve called this post ‘how to ruin potential sales’ as the people who send me these promotions are ruining their chance of me buying from them.

So What Are We Talking About?

Yesterday I received an email promotion from qHero. If you aren’t familiar with qHero – they are a business which offer services for stock photographers. I have been using qHero to upload stock images to iStockphoto since early 2017. More recently they started offering a stats feature and a retouching service. You can read about that in this post – qHero Stats Feature.

Flinders Street

I shoot a lot of Melbourne lifestyle stock content, so am a potential customer to qHero retouching service

What Was the Content?

Taken directly from the email, here is the offer from qHero.

“Retouching Special – 50% Off

With the summer over us, we feel that at least you should get to enjoy the sun. We know how much time and effort retouching takes, and it seems even longer during the summer. Whether the time is spent on managing retouchers inhouse or outsourced, or even worse doing the retouching yourself, it is guaranteed to keep you out of the sun.

We offer you 50% off on up to 200 files in retouching.

Convert the time saved from retouching, into time in the sun, makes it an easy choice. We are happy because we get to show you how awesomely easy it is to manage retouching directly in the tool you use already for uploading.

All you have to do is to use the promo code XXXXXXXX when ordering. This promo is valid until August 31st 2018, and as always we would love to hear what you think after trying our retouching service.”

Why is This Going to Ruin Potential Sales

This is going to ruin potential sales as it is poorly targeted!

I live in Melbourne, Australia where it is currently mid winter. It’s dark, cold and wet. At this time of year we spend more time indoors, and I spend some of that time doing post production work.

The idea of “convert time saved from retouching into time in the sun” is a nice idea, but would require me to book airline tickets and head to the airport! Hello Queensland or Fiji!

weather Melbourne

Today was a maximum of 12 degrees celsius in Melbourne. It’s not exactly summery right now!

What’s My Take Out from the qHero Email

I understand that the bulk of qHero customers will be in the northern hemisphere where it is currently summer. However, as they’ve sent me a summer promotion in the middle of winter it leaves me to think:

  • they don’t care about customers in the southern hemisphere
  • qHero don’t want customers in the southern hemisphere
  • they don’t have much attention to detail. (It would be ironic not have much attention to detail for a retouching service!)
  • although I have 10,000+ images at iStock and have uploaded more than 300 batches of images through qHero, I am just another ‘anonymous user’ to them

So, unfortunately qHero have ruined the chance of a sale by sending me a poorly targeted email promotion.

What Can We Learn

I am a believer that every business, big and small, can learn from experiences like this. I run a one person photography business, and many of the readers of Beyond Here are also running one person creative businesses. We have an advantage over big businesses because all of our customers are local. There’s no chance of me sending a summer promotion to a customer in mid winter (unless they have moved overseas without me knowing!) While it’s not likely that local businesses can make this ‘mistake’ there are lessons to learn.

Female tram traveller

Right now it’s cold in Melbourne. People are wearing coats and hats. Not quite the right time for a summer promotion email

Key Take Outs

I see three key take outs from this experience.

Number 1 – Personalize offers where possible. Being offered a summer promotion in the middle of winter tells me this is a mass mailing to a large number of people. Immediately I know that it is not targeted to me. Small business owners who really know their customers won’t make this mistake.

Number 2 – Know your customer. In this case, it seems qHero haven’t taken the time to really know their customer. I can’t remember whether I provided location information when I signed up for their upload service. I expect I didn’t. But I have uploaded more than 300 batches of images to iStock through qHero ….. and more than 290 of those batches would have the keyword “Australia”. A similar number would have the keywords “Melbourne” and “Victoria”. It would be fair to assume that I live in Australia based on those numbers. And right now in Melbourne it’s definitely not summer.

Number 3 – Don’t treat everyone the same. This point is similar to point 1 where we can learn to personalize offers. I wonder if qHero segmented their users based on how often they upload through qHero? or how many batches they upload? It feels to me like they didn’t, and that reinforces the lesson – don’t treat everyone the same.

The Wrap Up

I hope there are some key messages in here which will help your business and will make sure you don’t ruin potential sales. If you have had a similar experience, please share it in the comments. And finally, if the good people at qHero ever read this post, I think your upload and stats services are great. In your promotions I’m much more likely to buy something if you make me feel like a client or a partner. Thanks for reading ‘How to Ruin Potential Sales’.

Win Win Win Photography Business Thinking

Yesterday I came across a great example of win win win photography business thinking. Let me tell you about the experience.

I like to meet with photographers from time to time. It’s a great opportunity to share ideas and experiences, and I normally leave with ideas to implement into my business. Yesterday, I had separate meetings with two photographers. Both were very interesting and valuable, and in the second meeting I came across a great example of win win win photography business thinking.

woman pulling hair

Are you tearing your hair out looking for new clients? Can you use win win win photography business thinking as an alternative way to drive your business?

What’s the background?

There are not a lot of photographers in my home town producing high quality stock images in reasonable volumes. However, I recently came across one photographer in that category. We both contribute to an Australian image library called Austockphoto. I have been following her work there and on social media. I contacted her to see if she would like to meet for coffee and to discuss stock photography, and that led to our meeting and an exchange of ideas.

 What type of photography are we talking about?

The photographer has a background in advertising and visual media and, especially relevant, she has an eye for shooting home interiors. That started when she was renovating her own home. She had found a healthy market for home interior content in the image libraries she contributes to and, as a result, she continues to add that style of content.

thumbs up

Projects where there are multiple winners are good projects

What’s the win win win photography business thinking?

Among the things we discussed were the photography projects we were currently working on. As she has found a strong market for home interiors she is actively adding to her portfolio of these images.

Where’s the win win win? One project she is about to shoot is home interiors for an Airbnb property owner. As soon as she mentioned Airbnb property images, I immediately thought what a booming market she was tackling.

So, let’s break down the 3 wins

  1. The property owner. The photographer had asked the Airbnb property owner for a property release in exchange for professionally shot images of her property. Win number 1 – the property owner gets up to date, high quality images of the property at no cost.
  2. The stock photographer. Finding new material to shoot is a stock photographers biggest challenge. This is an example of getting access to a new location at no cost. Win number 2 – the stock photographer gets to generate new images for her stock portfolio with no financial outlay.
  3. The stock customer. Win number 3 is for the customers of the image libraries. They will have access to high quality, fresh stock images at fair prices.

What’s especially exciting about this idea is that she can replicate it over and over again. There is almost an unlimited opportunity in today’s sharing economy.

plan

Can you implement win win win photography business thinking in your business plan?

Can you implement win win win photography business thinking?

Is there an opportunity for you to implement win win win photography business thinking into your business? Do you know Airbnb property owners who you could offer your services to? Are there other parts of today’s sharing economy where you could provide photography services which benefit multiple parties?

I hope this example has given you some ideas which you can implement into your photography business. Thanks for reading win win win photography business thinking.

iStock Shutterstock Comparison

Regular readers of Beyond Here will know I have been a long time contributor to microstock. How long exactly? Well, this month takes me past 10 years of selling through microstock sites. For many of those years I was an exclusive contributor at iStock. I moved away from iStock exclusivity 6 months ago as I explained in this post Why I Dropped iStock Exclusivity. Since then I have primarily been building the Melbourne Stock Photos content. I’ve also been submitting my generic content to iStock and Shutterstock and that leads to this iStock Shutterstock Comparison.

Melbourne tourism

My Melbourne content is being uploaded to Melbourne Stock Photos

iStock Shutterstock Comparison 1 – Ease of Upload

I upload to iStock through qHero, and to Shutterstock through the Shutterstock contributor website. Both are intuitive, well designed processes which are straightforward to use. I like the keywording tools that both provide, and overall they are both easy to use. Well done iStock and Shutterstock. For me, one is not better than the other, they are just slightly different.

iStock Shutterstock Comparison 2 – Review Times

Ok. Review times is where we start to see a signficant difference. This week I uploaded the exact same content to both sites. (I find it interesting to see how the same content performs on the respective sites).

Keep in mind this is not an exhaustive, well researched comparison. This is just what I experienced this week. So what has happened? Shutterstock have reviewed my content within 4 hours for each of my uploads this week. iStock has been variable. The fastest has been 3 days, and the longest is still waiting to be reviewed after 5 days.

While it’s not likely to have a significant bearing on the long terms performance of those files, it is nice to see work being reviewed promptly. Well done Shutterstock.

iStock Shutterstock Comparison 3 – Getting New Content Live

Comparison point 3 leads on from point 2. Reviewing files promptly is important, but getting them live on the database and making sales is what really counts.

This is an area where Shutterstock seem to excel. Last night I had 4 files reviewed within 2 hours, and a sale made 1 hour later. I was surprised, as the content was not ‘news worthy’ but just solid stock material. This is not the first time this has happened, and Shutterstock appear to be excellent at getting new content in front of buyers. Well done Shutterstock.

Woman on horse

I am uploading my generic stock images to both iStock and Shutterstock

iStock Shutterstock Comparison 4 – Minimum Download Royalties

Today I received my monthly sales report from iStock. It was reasonably depressing reading with a minimum royalty received of USD$0.14. Perhaps I shouldn’t be so down beat, as I’ve received royalties as low as $0.06 in recent months from iStock.

At Shutterstock my minimum royalty per download comes from their subscription program and sits at USD$0.33 This is still a very low amount and I am going to have to have a lot of downloads to make any meaningful returns, but it is a long way ahead of what I am receiving from iStock.

Well done again Shutterstock. (If this post makes it through to Shutterstock head quarters – how about raising that minimum amount? Not just once, but year after year. Photographers would love you for it. You heard it here, you heard if first from one bloke down at the bottom of the world in Melbourne, Australia!)

iStock Shutterstock Comparison 5 – Sales Reporting

If you are a current iStock contributor you’ll have been seeing little progress with iStock’s sales reporting. Today I received my monthly sales report in text file format. Thankfully I can now upload the file to qHero to turn the data into something more meaningful. Unfortunately that ‘something more meaningful’ highlights to me the issues iStock have in getting new material in front of buyers. My old content continues to sell well, while my content from the last 12 months leaves me scratching my head and wondering if I will ever recoup the money invested in those shoots.

Shutterstock on the other hand have excellent reporting.

When a sale is made I receive notification on my smart phone. This shows me which file was sold, how much the royalty will be, and the current balance which Shutterstock are due to pay me. Excellent and immediate reporting. Well done Shutterstock.

It’s been very interesting for me to experience the Shutterstock process after nearly 8 years as an iStock exclusive contributor. The ultimate comparison will be which site has stronger sales and highest total royalty income. When I compare the tools available to contributors and my experience this week, Shutterstock is shining.

Thanks for reading iStock Shutterstock Comparison. Happy shooting!

4 Tips to Maximize Your Next Stock Photo Shoot

I have spend a good part of this month shooting, editing, and uploading to my stock photo portfolio. This included a shoot at a farm with a young woman and her horses. Experience has taught me that an authentic location like this would provide great opportunity to shoot strong images. It was a fun shoot and I’m pleased with the images. Based on that experience, here are 4 tips to maximize your next stock photo shoot.

Horse and woman

Different wardrobe helps create variety in images

Tip 1 – Have Your Model Change Wardrobe Mid Shoot

In this shoot, the model was well organised and prepared. We planned to shoot farm style images with her wearing casual clothes, and equestrian images with her wearing her usual competing outfit. Bringing the clothes and getting changed was easy for this shoot as it was held at her home. If you look at the images in this post, the lesson here is having your model bring a change of clothes can help you to produce a broader range of images. Of course, a broader range of images helps to produce more stock photo sales.

Horse barn

Different colored horses helped produce different looking images

Tip 2 – Changing Your Props Generates Variety

For this shoot, I considered the horses to be props. I hope that doesn’t offend horse and equestrian lovers!

The model had informed me in advance that she had two horses which she would be happy to have in the shoot. Fortunately the horses look quite different – one was a chestnut brown and the other a palomino. We shot with both horses, together and separately, near the barn. When we went to riding images, we used the horse the model was most comfortable riding and jumping.

You can make much more subtle changes to props which will help generate variety in your images. If your model has long hair, you can shoot with the hair down or tied up. If it is a sunny day, shoot with and without sunglasses. You get the idea. Tip 2 of our 4 tips to maximize your next stock photo shoot is to change your props throughout the shoot.

Equestrian

Shooting against a plain background produces a very flexible image which could be anywhere in the world

Tip 3 – Shoot Both Vertical and Horizontal Orientation

On Beyond Here I generally use horizontal orientation images as they look best on the blog. But don’t think I only shoot horizontal images.

Our goal in stock photography is to shoot images which will be downloaded and used by our customers. And our customers need choice between vertical and horizontal orientation images.

When I shoot vertical orientation I think about magazine covers. Nearly all magazines are in vertical orientation. They also need space at the top of the image to add the magazine name and edition details.

When I shoot horizontal orientation I think of web sites and how the images might be used online.

Tip 3, remember to shoot both vertical and horizontal orientation.

Show Jumping

The different locations shown in these images demonstrate how location can help produce different images

Tip 4 – Change Location

By changing location, we change the background of our images.

In this shoot we used:

  1. the barn area
  2. the holding pens
  3. a paddock with cross country jumps
  4. a show jumping area

These locations were all within 10 minutes walk and enabled us to create different images in each location. To maximize your next stock photo shoot consider which locations you will use, and plan for what type of image you will create at each location.

Thanks for reading 4 Tips to Maximize Your Next Stock Photo Shoot. Happy shooting!

7 Early Lessons Building an Image Library

Over the last 6 months I’ve had a dramatic change in my approach to stock photography. I had been an exclusive contributor to iStock since 2010 and had a portfolio of over 10,000 images producing a steady income. The problem was, the income was steady but not growing in line with my portfolio. I wrote about some of those issues in Why I Dropped iStock Exclusivity. At that time most of my stock photography friends were expecting me to spread my portfolio among the other major stock sites. I saw that being a very similar road to being with iStock, and instead focused on building an image library.

I can probably fill many posts with things I’ve learned on the journey so far – but for this post I have limited it to 7 Early Lessons Building an Image Library.

Lesson 1 – It Can be Done!

The most important point first – it can be done! Selling images via microstock sites is not the only option. Building an image library is an option and can be done.

Encourage

Building an image library can be done!

I went from committing to building it, to having a working website in 10 weeks. I’ve learned a lot on the way and could do it faster and more effectively if I was doing it again. But, coming back to lesson 1, if you are considering an alternative to microstock – building an image library can be done.

Lesson 2 – You Don’t Have to Build from Scratch

When I started seriously considering building an image library I had assumed I would have to build the website functionality from scratch. I assumed I would need to write a brief and have a web developer write the code. Good news, I was wrong!

There are several places where you can buy pre-existing capability which is proven in running other image libraries. So it was not a case of wondering if it would work, but buying the capability and tailoring it to my image library.

It was a big short cut and time saver to find that purchasing existing capability was going to be cheaper and easier than starting from scratch.

Lesson 3 – Knowledge of Hosting and Servers will Help

I had assumed that with some common sense and patience I’d be able to work out what was needed regarding servers and hosting for the new site.

On reflection I would say that is true. I also believe I caused myself unnecessary anxiety and worry by not talking to an expert before I started! My recommendation is to find an expert in this space. They will advise what you need.

Time saver

Getting expert help on the technical side will ultimately save you time and help you sleep better!

Save yourself some sleepless nights by asking an expert about hosting and servers.

Lesson 4 – There’s Value in Taking Time to Set Up Correctly

I decided to create a new company to keep the image library business separate from my photography business. If you haven’t done this before, setting up a new company is a relatively straight forward process which an accountant can help with.

Where’s the lesson here? In my desire to get moving I bought the domain name and registered it under my photography company (not the image library company). My speed in doing that then managed to slow me down. I had to subsequently transfer the web address to the new company, and wait several days for that to happen.

In hindsight it was not a big deal. But next time I would establish the new company first and then purchase the web address.

Lesson 5 – Things Take Time

In lesson 1 I outlined that I went from concept to working website in 10 weeks. Some might think 10 weeks is fast, and others will think it is slow. During this process I have learned that things which I assumed would move very quickly can take time.

Specifically I was surprised that setting up payment functionality through the bank would take time. There was plenty of paperwork involved, followed by review from the bank. There must be processes in the background for a bank to make sure everything is legitimate, but I hadn’t expected it to take several weeks. That’s worth knowing if you are setting up payment functionality on your own website or image library.

The second area which took longer than I expected was the legal agreements. The main ones I needed were a licence agreement for the image buyer, and a photographer agreement for contributing photographers. While from a legal point of view this is fairly straightforward, lawyers are not just waiting around for customers like me. They have a range of (mostly larger) projects on the go, and mine was not the A priority. In future I’ll allow more time for the legals to be completed.

Lesson 6 – User Experience of the Website is Key

I made a mistake in launching too soon without properly considering the user experience on the website. I was anxious to move from “build phase” to “proof of concept” on my business plan, and went live as soon as possible.

Puzzle

User experience is a very important piece of the puzzle

I’ve learned that having a working website is one thing. And having a website which is appealing and intuitive to customers is another. Unfortunately that meant that the first 1000 visitors to the site had a “less than ideal” experience.

Both the look of the site and the functionality are now much improved. This will be something we continue to develop. My recommendation is don’t be too anxious to launch. Invest time in making sure your site looks great and is intuitive for your user.

Lesson 7 –  Find a Web Developer You Trust

I have complete trust and faith in my web developer. It is so reassuring to know that the person on the other end of many emails and text messages is completely trust worthy and working to make the website a success. Nothing seems to have been too much of a problem despite there being lots of things to work on some weeks, and nothing to work on in others (thanks Alison!). Having a web expert you completely trust is great for peace of mind.

I have lots more lessons learned on this journey already which I will save for other posts. Thanks for reading 7 Early Lessons Building an Image Library. If you’d like to check out progress, please head over to Melbourne Stock Photos.


qHero Stats Feature

Since early 2017 I have been using qHero to upload images to iStockphoto. It is a very easy to use application (and it also makes the key wording process straight forward). In February 2018 they have announced 2 enhanced features. The first is that they now offer a retouching service. To me, that was interesting but it is not a service I plan to use. And this week they have announced a qHero stats feature.

Now the qHero stats feature is very interesting! Regular readers of Beyond Here and iStock contributors will know that providing good reporting has been lacking on iStock for several years now. (It seems strange that 10 years ago when I first started contributing to iStock you could tell in real time what was selling. 10 years on and now the contributor only finds out at the end of each month what has sold.) That’s not a great experience for a contributor and is one of the reasons why I dropped iStock exclusivity.

help

The qHero stats feature is a big help in analyzing the performance of my iStock files

The qHero stats feature doesn’t provide real time stats, but it is very easy to use and does provide useful information.

How to set up the qHero stats feature?

  • Step 1 – you need to be a qHero user. If you aren’t already, set up your free account on qHero.
  • Step 2 – at the top right of the screen is an option to choose stats, profile or logout. Click on the stats options.
  • Step 3 – you are now in the qHero stats feature. In the top left is a button to “upload sales reports”. These are the reports which you first need to download from Getty Images ESP site. It is a very simple process to download the text file from ESP (under My Performance / Royalties / Export). Save it somewhere on your PC, and then upload the text file to qHero. It is that simple – it took me less than 5 minutes to do that for all data since beginning of 2017.
  • Step 4 – you are now set up with your sales data in the qHero stats feature. Easy.
Woman

If I upload my shoots in batches I can tell at a glance how each is performing using qHero stats feature

What does the qHero stats feature tell me?

The qHero stats feature immediately calculates from your data – the number of downloads, and then provides analysis for each batch you’ve uploaded. That includes the $ return per batch, return per file, and return per download. Reports are available for ‘all time’, ‘last month’, ‘this year’, and you can also create custom reports.

At a glance the data tells me immediately:

  • What is selling and what isn’t
  • How much I’ve earned from an individual batch
  • Which batch is earning higher or lower amounts

And that insight immediately helps me to focus on producing the type of content which is producing the best returns. Nice!

service

qHero stats feature is a step forward in service for it’s users

Any weaknesses of the qHero stats feature?

I’ve just started using this feature and I see immediately:

  • the data is split by files uploaded using qHero and ‘other’. If you have always uploaded using qHero this is great as all your data will be available to analyse. I’m a long term iStocker and most of my files were uploaded before qHero existed. So only my more recent files have the useful stats of this feature
  • if you are not a qHero user this is no good to you! So if you were considering using qHero the qHero stats feature is another plus for it.

In summary:

I like the qHero stats feature! It provides immediate insight into the financial return of each shoot, and helps me to focus on producing images with the highest likelihood of a strong financial return. Well done qHero!


Use Events to Drive Business

I often hear photographers discussing (or complaining!) that they don’t have enough paying clients. My response is to ask what they are doing to generate more business. And generally the response is a blank stare which implies ‘isn’t my website and social media presence enough to have people knocking down the door?’ No, it’s not. People have lots of pressures on their time and money – and will only shoot with you if you give them a compelling reason to do it now. There are many ways to drive additional business. One way is to use events to drive business. Read on!

Australia Day

Special events drive sales of stock images

What do you mean events?

By events, I mean special occasions. Demand for a range of products and services picks up very predictably when these events occur. Let’s take an example. What do you think happens for sales of chocolates and roses every February? They boom just before Valentine’s Day! And they boom just before Valentine’s Day every year! It’s predictable.

How can you take advantage of that? Have you considered offering a couples shoot before Valentine’s Day? Or sell a gift voucher for the couple to shoot with you after Valentine’s Day? Do you get the idea? You use the event to create a reason for the shoot to happen now.

Want More Examples?

Regular readers of Beyond Here will know I shoot a lot of stock photography. Do events help sales of stock images? Yes! A resounding yes! Here in Australia there is a peak in sales of Australian themed images just before Australia Day at the end of January.

How do I capitalize on this? I shoot Australia Day themed images in October and November, and have them available in my stock portfolio by early December. That’s almost 2 months before Australia Day and ready for the increase in demand.

And there are lots more events during the year which drive similar spikes in demand. Think about Valentine’s Day, Mothers Day, Fathers Day, and your national holidays. Could you use events to drive business? I’m sure you could. It just requires a little planning and a compelling reason for clients to have the shoot now.

How can family photographers take advantage of this?

Lots of photographers specialize in families and portraits. Here’s how I recommend you make the most of events.

Australia Day

Got a national holiday coming up. Can you use events to drive business?

Events Specific to Your Clients

Once you have a client base you can generate your own ‘events’ by focusing on key moments for your clients. What are some examples? Your clients anniversaries and birthdays are obvious places to start! If you have a gap in your shooting schedule, contact a client who has a birthday next month and offer them a special for a shoot plus prints in time for their birthday.

Even better is when you have remembered your clients children’s birthdays. Offering a tailored shoot on the kids birthdays will show your clients you care (and really listened!) and can offer something unique to them.

Events Which Apply to ‘the Market’

If you don’t have an existing client base to tap into, use events which have broad appeal.

How about special family packages:

  • for families right before school starts
  • during the school holidays
  • for kids birthdays
  • before Christmas

These are all straightforward ways to use events to drive business. If you are waiting for clients to contact you because you have a great website and post regularly to social media – you may be waiting a long time. Grab the initiative and use events to drive business.

Shooting Moving Objects

Over the last 2 months I have been working with 5 other photographers to build a new image library. I didn’t know the photographers before we started the project, and it has been fun and challenging to work with them. One area that has become clear is that there is room for improvement in shooting moving objects. I have ‘grown up’ shooting sports and wildlife and selling prints. In that environment the images have to be in sharp focus. The 5 photographers are all younger than me and have ‘grown up’ in the era of Facebook and Instagram where there is less importance on fundamentals like having the image in really sharp focus. So here are a few pointers for shooting moving objects.

Focus Mode and Focus Point

Below is a straightforward lifestyle image of a woman walking across the road. This image can be very boring if she is standing still. Having her moving adds an energy to the image. So how do we maximize the chance of having her in sharp focus? Firstly we shoot in continuous focusing mode. I use Canon equipment, so on my Canon camera bodies that is AI Servo mode.

woman walking

Use continuous focus mode and a single focus point to maximize your chance of a sharply focused image

Choose a single focus point to tell your camera where the focus should be. In this case I pre-selected this point before we walked across the road, and I aimed it at the model’s eye closest to the camera.

Shutter Speed, ISO, and Depth of Field

For the shot above I wanted to blur the people in the background so I shot at f2.8. It was an overcast but bright morning, so I used ISO400. I knew at this ISO and f2.8 it would mean I could keep a fast shutter speed which again helps keep sharp focus in the image. The shutter speed in this image was 1/1600s.

In older DSLR bodies I would be very careful about raising the ISO as it would result in grain in the image. But with modern DSLR’s this is not a concern, and is not a consideration at ISO400.

What Shutter Speeds Should You Work With?

The answer to this question is to practice extensively. I know from taking thousands of images of moving objects what shutter speeds maximize the chance of a sharply focused image.

Of course the speed the object is moving has an impact on what shutter speed you will need. Again, from experience, I know that in the case of the image above any shutter speed at 1/400s or faster will give me a good chance of a sharply focused image.

Woman crossing

An image like this will have greatest chance of being in sharp focus if you shoot at 1/400s or faster

In the case of kids sport – I have shot many basketball games and know that 1/800s might not give me sharply focused images when the kids are running at full speed. At 1/1000s or faster I have a much better chance.

And for fast moving wildlife like the grey headed flying fox below, I’ll be aiming to shoot at 1/1600s or faster.

Shoot A Single Frame or Multiple Frames?

Like everything in photography (!) the answer is up to you. I like to shoot multiple images to give me choice among the images and as ‘insurance’ if one shot is out of focus. I shoot images of fast moving objects in burst mode and shoot 3 or 4 images each time.

Flying fox

This image was shot at 1/2000s to freeze the action of this fast moving flying fox. It was shot in burst mode.

If you are serious about your photography and committed to producing sharply focused images you’ll need to master shooting moving objects. Think for a moment about the possible scenarios – sports, live music, lifestyle portraits, stock, wildlife, wedding, events. The list goes on. If you can’t shoot moving objects well you are going to significantly reduce the options for earning money from your photography work.

I hope these quick pointers will help you with shooting moving objects. Next step – lots of practice! Happy shooting.

iStock Increasing Targets for 2018

In late 2017 I decided to give up my iStock exclusive status. That means I now receive a lower royalty rate from my sales on iStock, but I am able to make my images available through other sites. I outlined my rationale in this post.

The royalty rate that iStock exclusive contributors receive is based on their previous year results. The more your files are downloaded the higher royalty rate you receive. In December 2017, the new targets have been announced and you might not be suprised – iStock is increasing targets for 2018.

table of rates

I’ll focus on the photo information as I don’t contribute illustrations and have not submitted any new videos in the last 3 years,

So what does this information mean?

Firstly, as soon as you become an Exclusive artist you will receive a 25% royalty from your sales. Once you pass 550 downloads for the year, you will increase to 30%. That is a straightforward target if you have a reasonable sized portfolio. Then it starts to get hard. To move up to a 35% royalty you need to have 5,500 of your files downloaded. How hard is that? I have a portfolio of 10,000 images and will finish 2017 with around 4,300 downloads. So 5,500 is going to be difficult for most contributors. And from there the targets sky rocket. To achieve 40% royalty you need 22,000 downloads and to reach 45% you need 330,000 downloads. I would expect very few contributors are at these levels.

How does this compare to the previous years levels?

Achieving the 30% level is straightforward, so the key here is the 35% target. 5,500 downloads is a 10% increase on this years target.

What’s the context?

iStock recently announced that it has added 9.6 million files to it’s database in 2017. That’s likely to be dominated by photos (although iStock does accept other files as well).

How likely is success?

If you are striving to reach the 35% level you will need to achieve 5,500 downloads in an environment where there is a large increase in the number of files available. That is going to make success very difficult.

What to Do?

For a contributor to succeed in this environment they have 3 choices:

  1. Produce very high volumes of images to continue to grow income
  2. Produce very unique images so the influx of other contributors files doesn’t significantly impact them
  3. Look for other alternatives

These announcements from iStock reinforce my view that we are going to see the gradual decline of the micro stock libraries in favor of niche image libraries. Why? In niche libraries the customers will save time by only searching through relevant content, and contributors will be able to get higher royalties per download. I outlined those thoughts in 5 Stock Photography Predictions for 2018.

Plenty of iStock exclusive contributors will stick with the model they know despite iStock increasing targets for 2018. I won’t be one of them. What about you?