Tag Archives: studio photography

Starting Out With Light Modifiers

Many readers of Beyond Here are wanting to take the step into the professional photography ranks. They are looking to make photography a significant part of their income, and then make it their main source of income. Making that leap often means learning the skills and having the equipment to shoot multiple days of the week and in different lighting conditions. In many cases this will bring an ‘outdoor’ photographer indoor where they will need a range of lighting equipment, and the skills to use them. In this post we look at starting out with light modifiers. Here is an overview of the basic equipment.

Portrait

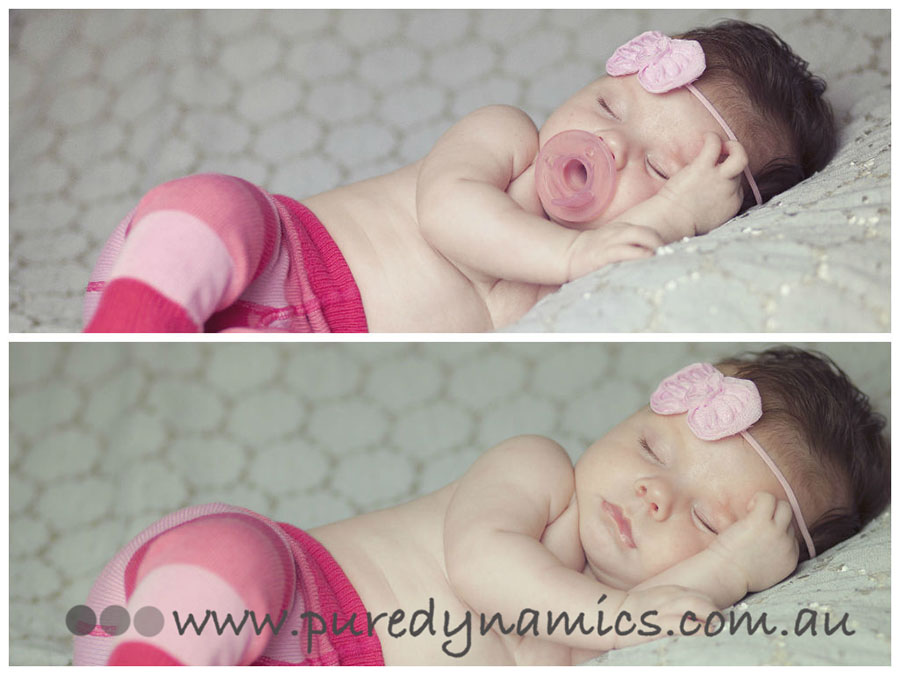
This image was shot with a single soft box to the left of camera

Reflector – a reflector is a very simple piece of equipment. They are straightforward to use and simply reflect the existing light. They come in silver and gold which create different levels of ‘warmth’ in the light. Reflectors come in a range of sizes and are cheap and worth having.


Diffuser

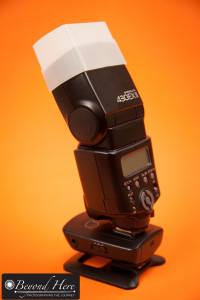
The simplest light modifier is a diffuser for a speedlite

Speedlite Diffuser – a speedlite diffuser is the most basic type of light modifier. They come in various forms, but the most simple is a piece of plastic which fits over the head of the speedlite. They are surprisingly effective in softening the light from your speedlite. They are very cheap and worth getting. The speedlite shown in the diagram is being used off camera. If you have never used your speedlite off camera, please see this post. Learning to use your speedlite off camera and softening the light will open up a new world of lighting opportunities for you.

Reflective Umbrella – umbrellas are ideal for creating soft light across a large area, which makes them useful for lighting groups of people. They are cheap and easy to use. The only disadvantage is that they tend to spread lots of light around. Like the reflector, reflective umbrellas come in different colors – silver, gold and white.

Shoot through umbrella

A simple set up for a speedlite to be fired through a shoot through umbrella

White Shoot Through Umbrella – shoot through umbrellas are great for diffusing light and spreading it evenly. They are simple to use, and as the name implies, you shoot the light through the translucent umbrella. They come in different sizes, so keep in mind that the light will be softer when coming from a larger source. Shoot through umbrellas and reflective umbrellas are very easy to use in an indoor environment. An example is in this post. Be very wary of using umbrellas outdoor. Even a very small gust of wind will catch the umbrella and blow your equipment over.

Scrims – a scrim is a square or rectangular frame with diffusion fabric spread across it. They are typically larger than umbrellas and can be used to create large areas of diffused light. Use a scrim to diffuse light from flash, continuous lights, or the sun.

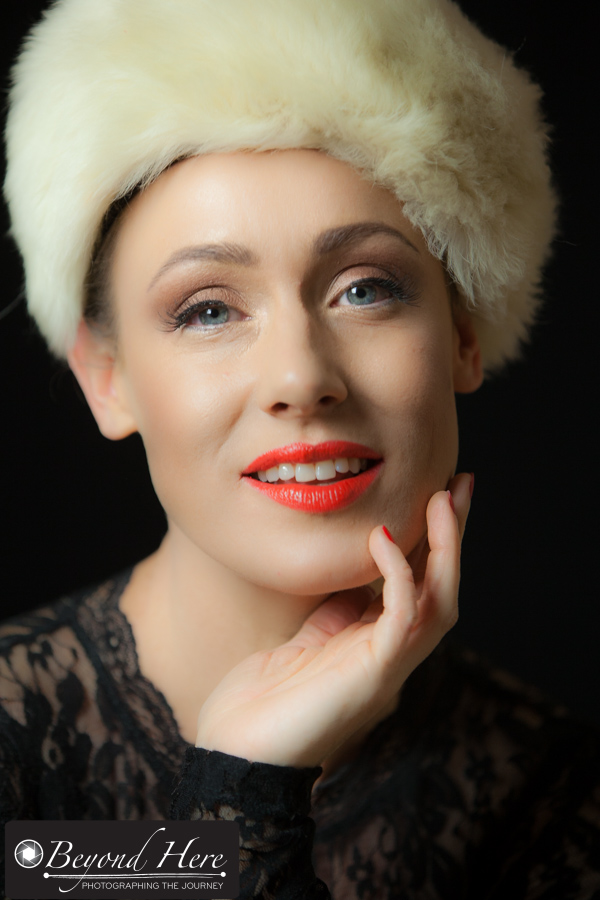
Soft box – soft boxes give the photographer more control of light than umbrellas. Soft boxes are what I use most frequently in the studio environment. They are simple to use and avoid light spreading everywhere in the studio environment. Soft boxes come in a range of different sizes from small to very large. Choose which is most appropriate for your lighting needs and your space.

Soft boxes

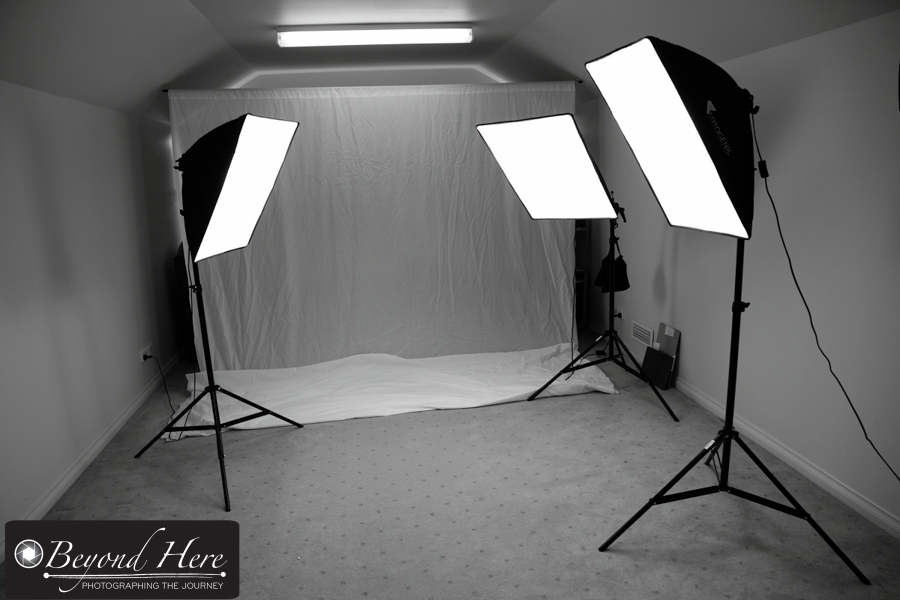
An example of soft boxes in a simple studio environment

That covers the very basics of starting out with light modifiers. This post only touches the surface of a large subject. I’ve done it without mentioning beauty dishes, gridspots, Fresnel lights, or an octabox! Thanks for reading starting out with light modifiers. I hope it has demystified light modifiers and given you the encouragement to begin modifying your light.

What are Continuous Lights

In an earlier post on Beyond Here, we discussed How to Build a Home Photography Studio. In that post, I provided a brief overview of the requirements for space, backdrops, and lights. Once you have decided to set up a home photography studio, the decision on lighting is the most complicated and expensive decision. Your choice is between strobes and continuous lighting. Many photographers are familiar with the concept of strobe lighting – they work like large flash units, emitting a short burst of bright light. In this post we look at the question, what are continuous lights?

Very simply, continuous lights are always on. Rather than emitting a short burst of bright light, they emit a continuous stream of light.

Continuous lights

An example of continuous lights in a home photography studio

So why use continuous lights? Continuous lights have several advantages over strobe lights.

  • What you see if what you get. With continuous lighting the effect on your subject can be seen before the shot is taken. If you want to alter the way the light appears, you can adjust your lights or subject and see the impact before taking the shot.
  • They are easy to use. If you are new to studio lighting, strobes can be daunting to learn to use. With continuous lights you literally turn them on and then position the lights and subject to achieve the desired look. They are very straightforward to use.
  • Continuous lights can be used for video. It is increasingly common to shoot video with a digital SLR camera. Continuous lights can be used to shoot video – meaning you can shoot both still images and video in your studio using one set of lights.
  • They are fairly affordable. The exact price of continuous lights will depend on your location, the number of lights  you want, and the power of those lights. It is worth checking with your local photography store or online shops.

To assess whether continuous lights are the right choice for you, it is worth knowing that they have some disadvantages in comparison to strobe lighting too.

  • Continuous lights are not as bright as strobes. If you want to ‘freeze motion’ in the studio you will be more effective in using the short, bright burst of light from strobe lighting.
  • Continuous lights need a steady power source. If you are planning to leave your lights in your studio, then continuous lights work very well. But if you want your lights to be portable, strobes will be a better choice.
  • Strobe lights give you a lot more options in terms of power. With strobe lights you have greater control of the power output from each light, giving many more lighting options in your studio.

I hope this post has been useful in understanding what are continuous lights.

Make the Most of Your Flash

Have you heard that your flash photography will improve dramatically if you use your flash off the camera? Believe me – it will. In this post I outline how to make the most of your flash by using it off camera.

So, how do we use the flash off the camera? In an earlier post I explained How To Use Flash Triggers (thanks to the readers who emailed me with positive feedback about that post). Flash triggers enable us to fire the flash when it is off the camera. With 3 other simple pieces of equipment you will be able to create images with soft, directional flash light. When you master this, you will really make the most of your flash!

Adapter

Attach the adapter to the top of the light stand

What equipment do I need? In addition to the radio triggers you will need:

  • a light stand
  • an adapter
  • a shoot through umbrella

First, you will need a light stand. This enables you to position the light at whatever height and distance from the subject you like. Second, you will need an adapter. This is the small piece of equipment which attaches to the top of your light stand. It allows the flash to sit on top of it. It also has a hole through it for the umbrella to fit in. Thirdly, you will need something to spread and soften the light. You can use a reflective umbrella or a shoot through umbrella. My preference is the shoot through umbrella as I find it enables better control of the light.

Flash

Attach the flash unit to the top of the adapter

How do I set it up?

(1) attach one of your flash triggers to the camera, and one to the flash
(2) set up your light stand
(3) attach the adapter to the connection point on top of the light stand
(4) attach the flash (with trigger attached) to the adapter
(5) thread the umbrella through the hole in the adapter

Now that you have this set up, you can position the light relative to the subject. If you don’t like how your subject is lit, move the light or adjust the power from the flash. Now, instead of being stuck with the flash on the camera, you can use your flash anywhere! This is how to make the most of your flash! (This is a one light setup, for additional light sources replicate the process for multiple lights).

What does it cost? This is a hard question to answer and depends where you live and where you like to shop! I live in Australia and buy most of my equipment at an online store. At that store there is currently a special offer which includes 2 radio triggers, a reflective umbrella, a light stand and an adapter, for A$140.

Off camera flash

The final set up

What next? To build on this lighting set up you can add a portable background. Once you have a background, you effectively have a simple, portable studio. I use this set up when doing corporate portraits in an office environment.

If you have questions about this set up, please feel free to add a comment to this post, or email me at craig@beyondhere.com.au

I hope this post has been useful and will encourage you to take the flash off the camera and make the most of your flash!

Newborn Photography Some Easy but Essential Tips

Newborn Photography some easy but essential tips is a guest post from Renate Hechter. Renate is the owner and operator of Pure Dynamics Photography in Sydney, Australia. You can find out more about Renate and Pure Dynamics Photography on the Beyond Here contributors page.

Newborn

Keep your newborn warm and well fed. Copyright Renate Hechter

Newborn photography some easy, but essential tips.

Thank you Craig for the opportunity to write a guest post on Beyond Here.  I am a family photographer, but love newborn photography best of all. It is such a privilege to be able to capture those early moments in the first few weeks of a baby’s life. It will be a keep-safe for the family and the baby in years to come.

When I tell people I do newborn photography, I often hear them gasp, “Wow – how long did it take to get that shot, must have been hours? You must be some sort of baby whisperer!”.

Of course I’m not! It may have helped that I have 4 small children and therefore have had to deal with 4 newborns at some point.

Rather like dealing with your own family, newborn photography is all about planning and preparation. Here are some easy, but essential tips that you can follow if you want to capture the first few weeks of a precious little one’s life.

  1. Make sure baby is safe

Safety, safety SAFETY!! You will need a baby spotter and mum usually works best.  They need to be clearly briefed as to their responsibility – they are to watch their baby and preferably keep a hand on baby at all times before the shot – looking out for hazards such as rolling off the baby posing beanbag.

  1. Newborn

    Take your time with newborn photography. Copyright Renate Hechter

    Make sure baby is fed

Really stress to the parents that baby is fed and burped before arriving and is coming to see you in their normal sleep time. You may want to get the family to arrive slightly early for their session, so mum have the opportunity to give baby a quick feed again, if necessary.

  1. Make sure baby is warm

Make sure where you take you photographs are toasty warm so the baby does not get cold – especially if you are taking pictures of naked or semi-clad babies. Turn the heating up to around 25 degrees C or use a directional heater. If using a directional heater, make sure you keep it far enough away from the baby’s sensitive skin.

The next few tips involve four S’s for helping to settle a newborn into a pose;

  1. Swaddling

Invest in a number of stretchy baby wraps.  They can be used successfully for babies who struggle to be settled straight away. Shoot your swaddling poses first if that’s the case.

  1. Shushing (or white noise) 

There are a number of smartphone and computer apps that you can download for white noise – turn up the volume – that is very effective for baby, and I find that it also relaxes the adults.  Relaxed parents mean a relaxed baby.

  1. Sucking

Have a dummy/soother ready and make sure you communicate this with the parents beforehand.  Some parents have dummy fear, but using a dummy to settle baby in the pose and then taking it out just before you take the shot works well.

Baby suckling

Use a dummy or soother to calm baby. Copyright Renate Hechter

7. Sidelying or stomach position

Almost miraculously, a lot of baby poses are in tummy or side-lying position.  Babies do love those positions and will often settle and fall asleep.  Keep a firm hand on baby in those positions, as that will aid them falling asleep.

8. Take your time

Add a good dose of patience into the mix. The newborn should be fast asleep when you attempt your poses, and that may not happen immediately.

9. Keep mum calm

Explain the process to the mum.  A calm and relaxed mum often means a calm baby.

Newborn

Newborns allow you to position them. Copyright Renate Hechter

10. The younger, the better

The best time to photograph newborn are between day 5 and 20.  During this time period, they tend to sleep a lot (especially if they are fed well). Your can also get them into those wonderfully squishy positions.

And last, but not least – Safety again!

So important, it’s worth mentioning twice.

Do not forget to enjoy your session!

Making Unique Portraits

In this post we look at an example of making unique portraits without spending hours in post production.

For this stock photography shoot, the model had very long red hair. We decided to make a feature of her long hair, to make an interesting and unique series of images.

Unique portrait

A unique portrait created using fishing line and parental support

How did we set about making these unique portraits? For the first portrait, we took her plaited hair and attached several pieces of fishing line at different intervals along the length of her hair. Her parents stood on each side of her, holding the fishing line. Then it was a matter of raising or lowering the different sections to achieve the wavy pattern. The total time to shoot this image was about 15 minutes. That consisted of preparing the fishing line, attaching it, and then taking a series of images to get the right look. What about post production? There were small parts of the fishing line visible in her hair and against the white background. These took about 5 minutes to remove in post production. There you have it, making unique portraits version one.

For the second image, the idea was similar, but the execution was different.

Unique studio portrait

Unique portrait created using a coat hangar threaded through her hair

In this case, we unwound a wire coat hanger, and threaded it through the models hair. This time, her hair was in a single plait. This made it possible to create more solid shapes out of her hair – in this case a large question mark. Once the shape was formed in the hair, again a parent held the coat hanger – which protruded from her hair. This one took longer to make. The coat hangar had to be threaded through the models hair, then shaped appropriately, and then the images taken. This took approximately 30 minutes and I was grateful for a very patient model. Again, about 5 minutes was required in post production to remove the coat hanger and parents hand which were visible in the corner of the shot.

There you go,  making unique portraits without spending hours in post production.

If you have found this interesting, you may be interested in these related posts:

Do you have a story to share about creating unique portraits? Please add a comment to this post.

How To Use Flash Triggers

Flash trigger

Flash trigger with flash attached

Do you want to learn to use your flash off the camera? And make a huge improvement in your flash photography? In this post we look at how to use flash triggers.

What are flash triggers? Flash triggers are small accessories which allow you to place your flash off your camera (they need to be within the triggers range). When you have learnt to use these, you will no longer be restricted to having the flash sitting on top of the camera. If you want the flexibility to create directional light with your flash – read on for how to use flash triggers.

How to use flash triggers?

Flash triggers are sold singly or in pairs. To get started, you need a pair of them. The flash is mounted on top of one trigger as in the picture on the right.

The other fits into the shoe on top of your camera – as shown in the second image.

These images show the flash triggers which I use – they are called Cactus Flash Triggers V5. A pair of these triggers currently costs A$90 at the online store I use.

Flash trigger

Flash trigger attached to the camera

What settings to use?

Each trigger has a small switch on the left hand side (see the image on the left and the picture below).

The trigger which sits on top of your camera needs to be set to Tx – which stands for transmitter. The one which has the flash on it needs to be set to Rx – which stands for receiver.

When you press the shutter it sends a message to the transmitter, which sends a pulse to the receiver, which then fires the flash.

Flash trigger

Set the trigger attached to the flash to Rx

There is a further switch on the right hand side of the trigger (not shown in the images here). It has a number which relates to a channel. Make sure you have both your transmitter and receiver set to the same channel so they can “talk” to each other. For example, set them both to number 7.

The flash triggers use standard AAA size batteries.

When to use flash triggers?

Flash triggers have many uses. I use mine most often in the studio for additional light, at weddings to create directional light, to light interiors when photographing rooms, and in my stock photography work.

I wrote an earlier post on how to create images with white backgrounds which makes use of flash triggers.

Has this post been useful to you? Has it demystified flash triggers and off camera flash? Has it given you confidence to give it a try? Do you have any questions about flash triggers?


How to Build a Home Photography Studio

In this post we cover how to build a home photography studio, based on my experience building one 18 months ago.

Step 1 – Space

How much space will you need? Most standard size backgrounds are 3m wide, so ideally you want a room that is wider than this. You will see in the photo, my room is about 3.2m wide at the ceiling and slightly wider at the floor (due to the odd shaped ceiling). How long the room is, is less critical. Any space more than 4m long will be plenty for most studio shots.

Step 2 – Backdrops

Your key decision with backgrounds is whether you want to use paper rolls which will need to be replaced over time, or an alternative. Paper rolls work really well where you do full length model images and have a hard floor.

My room is carpeted and I do very few full length shots. I chose to use muslin backdrops. These are readily available from studio photography stores or online.

Home photography studio

Home photography studio

Step 3 – Hanging the Backdrops

While you consider which type of backdrops to use, you also need to consider how you will hang them. A common choice is to buy a portable stand which they hang from. I didn’t go down this path as you need enough room to fit the legs of the stand in your room. That would have been wider than my room is.

I chose to put mounts in the ceiling and hang the backdrops on standard size curtain rods. The rods are 3.1m and the backdrops are 3m wide. The curtain rods are very affordable – A$9 each from my local hardware store.

The downside of this system is that the backdrops are not portable. (I have a separate “pop-up” backdrop which I use when I need a portable backdrop. I will save that for another post.)

The upside is that the mounts in the ceiling are very secure, and although you can’t see it clearly in the picture, it means I can hang 5 backdrops at once (one in front of the other).

Step 4 – Lighting

Step 4 is straightforward but potentially the biggest decision from a cost point of view. As you can see, I decided to get three lights, soft boxes, and stands. This gives me a variety of options for lighting a fairly small space. These are relatively inexpensive and low power. I was able to do this due to the small space, and to keep costs down.

I also use speed-lites with shoot through umbrellas when I need more lighting options.

Step 5 – Get to Work

It really is that simple to get started. Now that you know how to build a home photography studio, its time to get to work!

Do you already have a home photography studio? What were the key lessons from building it? If you haven’t built a home studio yet, do you have questions I can help with?

How to Create Images with a Clean White Background

Human hand on white background

Number 1. Human hand on white background

This post looks at how to create images with a clean white background. This style of photography is ideal for:

  • adding images to a white page or website
  • photographing products to sell online
  • creating a clean, fresh look for your images
  • building a stock photography portfolio

So, what do we need?

1. We need a white or white-ish background. This can be a white wall, or sheet, or studio background. It can be anything as long as it is white or nearly white.

2. We need two light sources – one to light the subject and the other to light the background. This can be as simple as a window to let natural light fall on the subject and a flash or bright lamp to light the background.

3. A subject! Of course. And a camera! (And maybe some patience if you are doing this for the first time.)

Volunteer concept on white background

Volunteer concept. White background.

How do we create these images?

1. The images here are shot in my studio using a white, muslin backdrop. They have a set of studio lights to light the subject, and a flash to light the backdrop. I use a radio trigger to fire the flash. If you don’t have that equipment, don’t worry. Just make sure you have two light sources.

2. There needs to be distance between the subject and the background. In these images the subject is approximately 3 meters in front of the background. The flash is placed between the subject and the background, aimed at the background.

3. The light on the background needs to be brighter than the light on the subject. This is why a flash works well. It produces a very bright flash of light which makes your white background appear pure white. You can measure the light using a light meter if you have one. If not, use trial and error. If you are using a flash you will rarely need it on full power. I generally use one-half or one-quarter power on the flash.

Money laundering

Concept for money laundering on white background

If you are feeling overwhelmed by different light sources and power settings – don’t be! I have a friend who shoots this style of image using natural light, a single lamp, and a white wall in his house. He produces very clean images like the ones here – without any fancy equipment!

Once you have understood how to light the subject and the background independently it is very easy to create images with a clean white background. They are very useful for both web and print application and are used extensively by graphic designers. Subjects isolated on white backgrounds have been core material for stock photographers.

You can produce images like this too!


Portrait Photography Tips Fill The Frame

Do you want to improve your portrait photography? An almost universal rule for taking more compelling portrait images is to fill the frame with your subject. That means getting closer to the subject (or zooming in closer) so that the subject entirely fills the frame.

It doesn’t matter whether the subject is people, animals, or objects – fill the frame with the subject for more interesting images. This can feel a little funny at first, particularly as you move in closer than you normally feel comfortable. Push through the discomfort – it will be worth it and your portrait photography will benefit.

I find the best way to do this is to stand much closer to the subject than you normally would. If you are feeling uncomfortable, like someone is in your personal space, then you are in the right spot.

Why does this work?

Filling the frame with your subject creates more compelling images because:

  • it focuses the viewer completely on the subject, and
  • it removes any distracting background elements

Show me an example!

Portait where the subject fills the frame

Portait where the subject fills the frame

Here is an example of a children’s portrait.

It was shot indoor, with a large glass window behind me. The window was not in direct sunlight, so it was producing very soft natural light across the subject. The room contained furniture and children’s toys. These are normal elements in a home with children but they have the potential to distract your viewer if you include them in your image.

In this case, although I was using a 24-105mm lens, I didn’t need to use the zoom right to the 105mm end of the range. I was close to the subject and managed to fill the frame completely with the subject. The result – a simple compelling portrait photograph (which doesn’t show the clutter and mess in the room around them.)

This is one of my favorite portrait photography tips.

How do you find standing close to the subject and filling the frame? Do you find it more effective to position yourself close to the subject, or a little further back with some zoom?